Spray Bar Hole Spacing Calculator
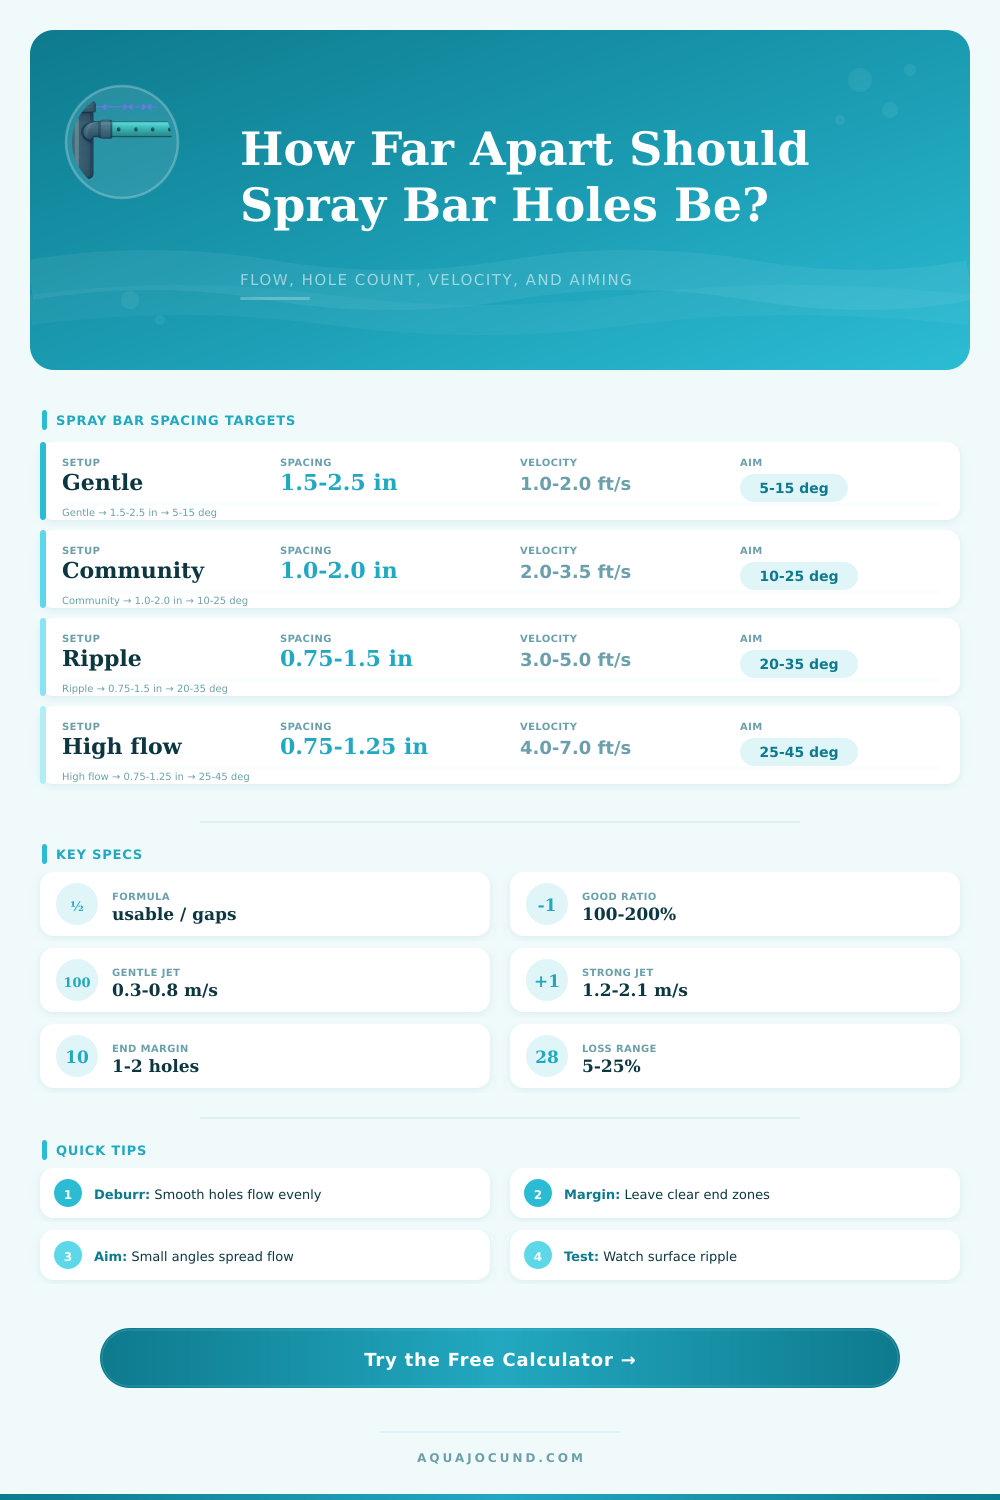
Size hole spacing, outlet velocity, per-hole flow, end margin, and aiming angle for aquarium spray bars.
Calculation Breakdown
| Finish | Coefficient | Best Use | Spacing Note |
|---|---|---|---|
| Rough drilled acrylic or PVC | 0.58 | Quick prototypes | Expect uneven output; leave room to enlarge holes. |
| Clean drilled PVC | 0.62 | Most DIY aquarium bars | Balanced starting point for 1-2 in spacing. |
| Deburred round hole | 0.67 | Reliable daily use | Smoother edges reduce local restriction. |
| Light chamfer | 0.72 | Higher flow returns | Improves flow without adding bulky nozzles. |
| Short nozzle insert | 0.80 | Directional jets | Use wider spacing when streams stay narrow. |
| Rounded or flared outlet | 0.88 | Low loss custom bars | Often works with lower pump pressure. |
| Tank | Typical Bar Length | Example Holes | Typical Spacing |
|---|---|---|---|
| 10 gal / 38 L | 10-14 in / 25-36 cm | 8-10 holes | 1.1-1.7 in / 2.8-4.3 cm |
| 20 long / 76 L | 18-24 in / 46-61 cm | 12-16 holes | 1.2-1.8 in / 3.0-4.6 cm |
| 29 gal / 110 L | 22-28 in / 56-71 cm | 14-20 holes | 1.2-1.9 in / 3.0-4.8 cm |
| 40 breeder / 151 L | 28-34 in / 71-86 cm | 18-24 holes | 1.3-1.8 in / 3.3-4.6 cm |
| 55 gal / 208 L | 36-44 in / 91-112 cm | 22-30 holes | 1.4-1.9 in / 3.6-4.8 cm |
| 75 gal / 284 L | 40-48 in / 102-122 cm | 26-34 holes | 1.3-1.8 in / 3.3-4.6 cm |
| Outlet Velocity | Flow Feel | Good Angle | Use Case |
|---|---|---|---|
| 0.2-0.5 m/s | Very gentle | 5-15 degrees | Shrimp, fry, delicate stems |
| 0.5-1.0 m/s | Moderate sheet | 10-25 degrees | Community and planted tanks |
| 1.0-1.6 m/s | Active ripple | 20-35 degrees | Surface agitation and oxygenation |
| 1.6-2.4 m/s | Strong jets | 25-45 degrees | River style or reef circulation |
| Above 2.4 m/s | Very forceful | 30-60 degrees | Usually reduce pump or enlarge holes |
| Total Hole Area / Pipe Area | Expected Behavior | Adjustment | Spacing Impact |
|---|---|---|---|
| Under 70% | Restrictive, high velocity, more pump strain | Add holes or enlarge diameter | Spacing usually too wide or holes too small |
| 70-100% | Firm jets with useful pressure | Good for surface movement | Works with tighter hole spacing |
| 100-200% | Balanced distribution | Best general target | Most predictable spacing range |
| 200-300% | Gentle, lower velocity | Good for delicate tanks | Can use many small holes |
| Above 300% | Diffuse and uneven risk | Reduce hole count or diameter | Spacing likely too tight for pump flow |
So you buy a new spray bar, mount it on the tank, turn it on…and see water pouring out of 3 holes while the rest is bone dry. What’s wrong with that picture? A lot. But it mostly just looks wrong. Because it is. The pump is pushing hard against something, but there’s hardly any resistance by the intake, so it goes that way, doesn’t really care what happens at the other end, etc. Sound familiar? That’s a classic manifold issue. Water takes the path of least resistance; not necessarily the fairest, but easiest.
You want all the holes to feel equally easy to leave by spreading them across entire width of the tank. Once you know your pipe dimensions and pump specs, plug them into the calculator above. It do the math for you. This way, you won’t have to guess how many hole you need or where they should go, or worry about leaks and ripples.
How to Build a Better Spray Bar
First, consider length. How long is your tank? Deduct a safety factor at each end. The first and last holes should be away from capped tips or elbows as water slows there and pressure build unevenly. The reason: drilling straight to the edge creates dead zones that gather waste and deprive your fish of circulation. Keep in mind you want some clear pipe at each end (an inch or two) to ensure even flow through drilled portion. It is a small detail, but it make a difference in how things are distributed.
Hole size and count follow. A smaller number of larger holes results in more power but less area covered. On the other hand, more numerous small holes produce less power (velocity per stream) but a softer jet/sheet effect instead. Depending on your tank this may be what’s needed. For example, shrimp tanks requires a whisper; reef tanks frequently want a wind tunnel. Use the calculator to calculate how fast the water will blow out of an outlet given total flow and hole diameter. You’ll know whether you’re seeking a hurricane or just a breeze before drilling a thing.
Watch the open area ratio… That’s the total hole area compared to the pipe’s internal cross-section. To be blunt, if you’re not opening at least half as much area as the pipe itself, you’re choking it. You’ll get erratic velocity, pressure spikes and a harder working pump. Ideally the balance is somewhere from one hundred to two hundred percent of the pipe area (typically). This will provide sufficient pressure to eject water but not choke system. The chart on the page lays that out well in various situations.
This is where it gets interesting: hole finish matters. Turbulence caused by rough-drilled holes reduces effective flow, so you won’t actualy get as much velocity as the theory says. Chamfering or deburring the holes smoothes out the exit path which leads to increased consistency and efficiency. Perfect industrial machining isn’t required here; however, a few minutes with a file can make very noticeable difference when it comes to even distribution of water. It doesn’t cost anything more. It solves half of common DIY spray bar issues.
Direction matters, and directional flow is more important than many realize. Directing it directly outward results in hitting the glass & splashing right back into uselessness. Slanting slightly down (or even up slightly) help encourage correct circulation loops & agitation at surface. Often, just a 10-15 degree change will give you a rolling flow that pushes all the way to the bottom but doesn’t upset the substrate too much. Fine tune according to your tank’s height & desired flow pattern.
Don’t go all-in without testing. Adjustability is key (use nozzle adjusters or temporary holes). Run it for an hour and observe. Are there areas with no water flow? Is there too much splashing? Are streams even or uneven? It’s OK to fine tune. You are unlikely to get perfection the first time.
You’re not striving for spreadsheet-perfect…you want to create a tank alive with a balance of motion that suits your specific inhabitants. The math is simply a map. The reality lies in observing what happens when you change that moving water and keep changing it until it feels correct. Once you understand the relationship between velocity, spacing, and pressure, you no longer fight your equipment. Instead, you begin working with the physics. Fluid dynamics. Suddenly, that spray bar isn’t a leaky pipe anymore. It’s a precise tool to control your water column.