DIY CO2 Duration Calculator
Estimate how many days a yeast CO2 bottle will run from sugar, yeast, bottle volume, room temperature, check valve drag, leak rate, and planted tank demand.
🧪Named Duration Presets
🍾Bottle and Recipe Inputs
🛡Line Loss and Check Valve Inputs
🌿Tank Demand Inputs
DIY CO2 Duration Estimate
⚗Recipe Comparison Grid
📊Duration Factor Specs
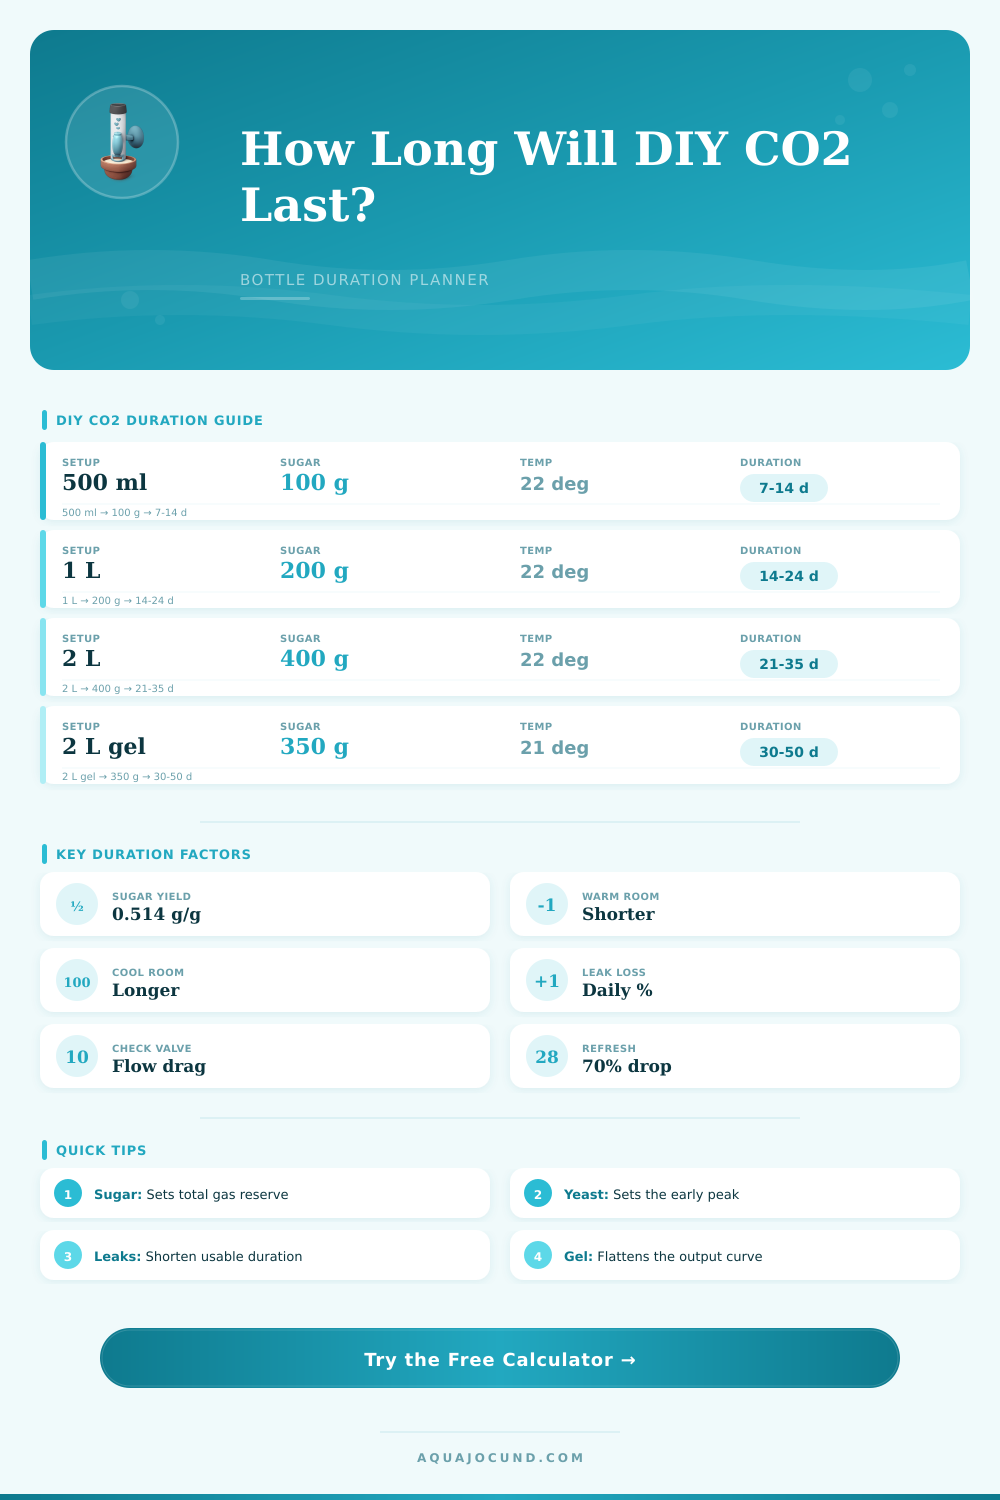
🍼Common DIY CO2 Bottle Recipes
| Recipe setup | Working volume | Sugar range | Typical duration |
|---|---|---|---|
| Nano soda bottle | 0.4-0.5 L | 75-125 g | 7-14 days in small tanks |
| One liter bottle | 0.8-1.0 L | 150-250 g | 14-24 days with moderate yeast |
| Two liter bottle | 1.5-1.8 L | 300-450 g | 21-35 days in planted tanks |
| Two liter gel mix | 1.5-1.8 L | 300-400 g | 30-50 days with lower peak |
| Dual bottle stagger | 2 x 1.5 L | 250-350 g each | Refresh one bottle at a time |
🌡Temperature Effect Reference
| Room temperature | Fermentation pace | Duration effect | Planning note |
|---|---|---|---|
| 16-18°C / 61-64°F | Slow | Longer but delayed | Use patience or a touch more yeast |
| 20-22°C / 68-72°F | Moderate | Predictable baseline | Best range for most recipes |
| 24-26°C / 75-79°F | Fast | Shorter and peakier | Use less yeast or gel |
| 28-30°C / 82-86°F | Very fast | Much shorter | Watch livestock and pressure |
🛠Leak and Check Valve Reference
| System condition | Typical loss | Duration impact | What to check |
|---|---|---|---|
| Fresh tubing, tight caps | 0-2% per day | Minor | Cap gasket and airline barb |
| Standard check valve | 3-6% per day | Noticeable | Valve direction and cracking pressure |
| Long tubing run | 4-9% per day | Moderate | Kinks, old silicone, loose fittings |
| Sticky valve or leak | 10%+ per day | Large | Soap test around every joint |
🌿Planted Tank Demand Reference
| Tank style | Daily CO2 rise | DIY duration pressure | Best practice |
|---|---|---|---|
| Low light moss or ferns | 4-8 mg/L | Low | Longer bottle intervals are realistic |
| Moderate community tank | 10-16 mg/L | Medium | Classic one bottle range |
| Stem plant growth tank | 16-22 mg/L | Medium-high | Use good diffusion and refresh early |
| Carpet or high flow tank | 20-30 mg/L | High | Consider staggered bottles |
| Heavy surface agitation | 22-35 mg/L | Very high | DIY output may swing too much |
If you maintain a planted aquarium, chances are you worry during second week of each month. The continuous raindrops from your diffused gas supply has slowed to an awkward drip. Your drop checker have changed from blue to green, alerting you to insufficient carbon dioxide for your stem plants. And there you are, holding a bottle of yeast mixture, wondering whether it’s too spent or merely tired.
With the DIY CO2 duration calculator, however, you won’t be guessing before mixing your first sugared water. Instead of panicking after the fact, you’ll plan ahead.
How to Plan Your DIY CO2 Supply
The one variable that powers the whole thing is sugar. Sugar turn into carbon dioxide through yeast. The relationship between those two are pretty straightforward. The tool assumes about 50% efficiency, meaning approximately 0.5g CO2/g sucrose. That’s as good as you’ll get no matter how many grams of yeast you throw at it.
You can use lots of yeast to produce a bunch quickly, but you won’t be able to exceed amount of sugar available. If you’re making lots of early explosive brews, you risk stressing your livestock or popping open your bottle under pressure. That upper bound become the cap on your potential output.
The calculator estimates how long it should of take for your reserve to run out based off how fast tank is using it. It’s supply vs demand with the additional constraints of real world. This process is throttled by temperature. Placing the bottle in a cool basement makes yeast work slowly, extending the timeline but delaying the onset. Sticking the bottle into a warm kitchen speed up the process… Shortening the overall timeline while putting more output at the start. The tradeoff between these two factors is visualized in tables on the page. These tables shows how much a couple of degrees can change your timeline, sometimes by almost an entire week.
Until plants start starving, most hobbyists don’t consider line loss. Long tubing or a stiff check valve impose backpressure that limits flow. In effect, it suffocates the system well before yeast have all eaten. The tool allows you to input these mechanical resistances. You’ll be able to observe how much gas is being lost to leaks/flow resistance vs. What is actualy going into the water.
Performance also depends on diffusion efficiency. Once CO2 reaches the tank, not everything stays there. If your diffuser doesn’t do a good job, then it put out big bubbles which float up and escape into room air. You’re wasting what you paid for. By allowing you to choose your diffuser type, the calculator will adjust for this. Ceramic stones are very effective, capturing much more gas than simple bell diffusers. An upgrade to a better piece of hardware can make two tanks with equal-sized yeast bottles last differenter amounts of time. Better capture efficiency cost less than brewing bigger mixtures.
You want consistency not max out. Sporadic surges aren’t good for plants. They like steady supply, not feast/famine cycles. It will tell you how long to wait between doses until the supply runs out and there is not enough left to use. That way you’ll plan a refill just before it crashes so there isn’t any unexpected moment when everything goes belly up and you’re in a lull.
If you plan for this, then no growth will be stunted and no algae will bloom. You can get the next dose ready while previous still hasn’t given up yet and it all smoothly blends together. A biological process that was once wildly inconsistent and chaotic becomes predictable and useful. Now your plants has something they can rely on and don’t have to go through the stress of counting every last bubble.