Canopy Dimensions Calculator
Size aquarium canopy panels, overhang, inside clearance, lid sections, airflow openings, and trim lips from your tank measurements.
📌Quick Tank Presets
📏Canopy Inputs
Use finished outside tank measurements. For acrylic tanks with top flanges, measure the widest point the canopy must clear.
🛠Canopy Build Spec Grid
📋Canopy Style Reference
| Style | Typical Height | Back Opening | Best Aquarium Use |
|---|---|---|---|
| Low profile LED cover | 4-6 in / 10-15 cm | 1-2 in / 2.5-5 cm | Nano tanks, betta tanks, and simple freshwater displays |
| Standard hinged wood hood | 8-12 in / 20-30 cm | 2-3 in / 5-8 cm | Community aquariums with feed doors and service access |
| Tall reef lighting hood | 12-18 in / 30-46 cm | 3-5 in / 8-13 cm | Reef lights, protein skimmer clearance, cooling fans |
| Open-back service canopy | 8-14 in / 20-36 cm | 4-8 in / 10-20 cm | Hang-on filters, hard plumbing, cords, dosing tubes |
| Rimless floating-look canopy | 5-10 in / 13-25 cm | 1-3 in / 2.5-8 cm | Clean display tanks where the canopy should barely overhang |
| Heavy braced display canopy | 12-20 in / 30-51 cm | 3-6 in / 8-15 cm | Long aquariums needing stronger rails and removable sections |
📐Common Tank Canopy Dimensions
| Tank Size | Outside Tank Footprint | Starter Canopy Footprint | Common Canopy Height |
|---|---|---|---|
| 5 gallon | 16 x 8 in / 41 x 20 cm | 16.75 x 8.75 in / 43 x 22 cm | 5-7 in / 13-18 cm |
| 10 gallon | 20 x 10 in / 51 x 25 cm | 20.75 x 10.75 in / 53 x 27 cm | 6-8 in / 15-20 cm |
| 20 long | 30 x 12 in / 76 x 30 cm | 30.75 x 12.75 in / 78 x 32 cm | 7-10 in / 18-25 cm |
| 29 gallon | 30 x 12 in / 76 x 30 cm | 30.75 x 12.75 in / 78 x 32 cm | 10-14 in / 25-36 cm |
| 40 breeder | 36 x 18 in / 91 x 46 cm | 37 x 19 in / 94 x 48 cm | 10-14 in / 25-36 cm |
| 55 gallon | 48 x 13 in / 122 x 33 cm | 49 x 14 in / 124 x 36 cm | 10-14 in / 25-36 cm |
| 75 gallon | 48 x 18 in / 122 x 46 cm | 49 x 19 in / 124 x 48 cm | 12-16 in / 30-41 cm |
| 125 gallon | 72 x 18 in / 183 x 46 cm | 73 x 19 in / 185 x 48 cm | 14-18 in / 36-46 cm |
🌡Lighting And Ventilation Guide
| Lighting Class | Clearance Below Lid | Vent Opening Target | Useful Canopy Detail |
|---|---|---|---|
| No internal light | 1 in / 2.5 cm | 10-15% | Still leave cord and airline pass-throughs at the back |
| Low heat LED strip | 1.5-2 in / 4-5 cm | 15-18% | Slot vents near the back usually handle evaporation |
| Medium LED bar | 2-3 in / 5-8 cm | 18-22% | Pair rear slots with small side vents for steady airflow |
| High output planted LED | 3-4 in / 8-10 cm | 22-28% | Leave enough height to clean splash covers without removing the canopy |
| Reef light cluster | 4-8 in / 10-20 cm | 25-35% | Use fan cutouts or an open back to prevent trapped heat |
| Legacy hot fixture | 5-8 in / 13-20 cm | 30-40% | Add protected vents high on the sides and avoid sealed lids |
🔧Panel And Trim Planning Notes
| Part | Calculator Basis | Adjustment To Check | Why It Matters |
|---|---|---|---|
| Front panel | Outer length by canopy height | Door cuts, hinge type, feeding flap | The front is usually the visible face and needs clean alignment |
| Side panels | Outer depth by canopy height | Subtract front/back panel thickness if using captured sides | Joinery style changes whether side panels run full depth |
| Top lid panels | Outer length by covered depth | Back gap, hinge barrel, front lift clearance | A split lid keeps feeding and maintenance easier |
| Inside trim lip | Inside opening minus small corner relief | Glass thickness, plastic trim, rimless protection pads | The lip stops the canopy from sliding on the aquarium rim |
| Vent cutouts | Target percent of top and side panel area | Light heat, humidity, splash direction | Good airflow reduces heat buildup and condensation |
| Back rail | Outer length by remaining rear height | Filter slots, plumbing gaps, cord routing | The rear should brace the canopy without blocking equipment |
💡Practical Sizing Tips
The 55-gallon display tank is framed, the wood is perfect, and you’re holding a blank piece of plywood that will become a canopy. That’s where most DIY aquarium get hung up, how do you guess the right size for a hood? Calculating the right canopy dimensions require precision and causes frustration.
If the canopy are too small, it binds on a hang-on filter, cracks rimless glass, or both. Too large and it doesn’t prevent water evaporation and looks like amateur job.
How to Measure for Your Aquarium Canopy
Once you know how big your tank is (outside), the above calculator do the math for you so you don’t have to deal with conversions & coefficients, but knowing what those numbers mean is where the skill set come in. When measuring, the worst error people make is thinking in terms of gallons of water instead of physical size. Yes, they order a “55-gallon” tank. But what does that mean? It means that tank will hold 55 gallons of water! But the physical size is different based off who makes it and how thick glass is. Then there’s rims vs no rims and all the rest.
You must measure from the outer, finished edge, whether it’s a beveled rim of glass or some sort of plastic rim or trim. This is your starting point for everything else. One-quarter inch too close, and you can’t get the whole canopy right. Little things matter.
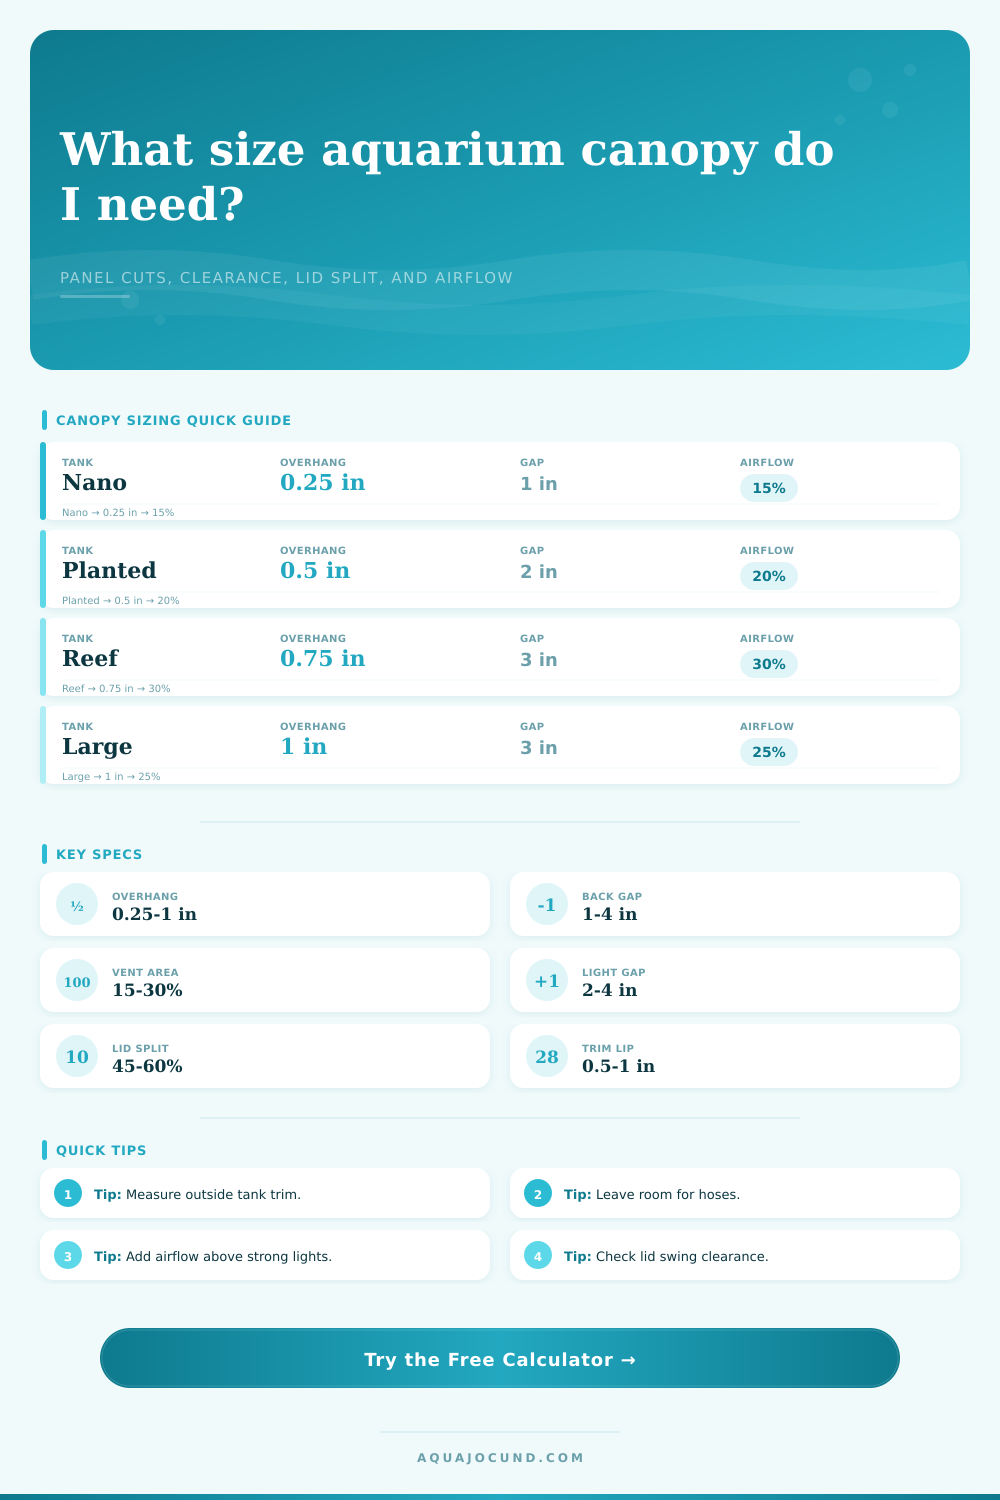
Next is the length and width, then what about the overhang? How far does the canopy stick out past the edge of the tank? In most cases, a standard hood will be built to project 1/2″ on both sides. This provides a visual frame around the tank and keeps it from sliding off when performing maintenance. With the tool you can make these adjustments as much (or little) as you’d like depending on if you prefer something more floating/tight looking or something more braced and robust.
The page includes a reference table that lays all of this out and explains how different styles corresponds to typical back opening sizes and overall hood heights. Note that reef tanks tend to have higher hoods. This is not necessarily because they need to look cooler, but because they typically include high-output LED arrays and a protein skimmer that needs vertical space to move air and dissipate heat. If you don’t go tall enough, the top layer of water cook and the light fixture bake resulting in algae bloom and temperature instability.
The second important variable is ventilation. Even though you may have a hood that seals, it doesn’t matter as much since trapped heat is far worse than any moisture loss. Based on the power of your lights, generally 15-30% of the panel area need to be exchanged (the calculator prompts for this). So if you’re running one of those super-powerful plant lights, you’d want even more air exchange to avoid condensation dripping down on your electronics.
The other helpful feature is the front lid split. Many hoods has their lids split where the front part can lift open for feeding while keeping the back in place to hold the lighting. A popular sweet spot for this is about a 55% split which allows you space to get a hand into the tank without completely removing the lighting set up.
Theory loses to experience when it comes to the build allowance. Aquarium rooms are notoriously damp so wood will expand and contract with humidity. To avoid having the wood swell and bind to the glass, I’d suggest adding a bit of clearance if you’re in a humid climate. It has presets for that so you can choose anywhere from a tight fit to a very service heavy clearance.
How frequently do you intend to be lifting the hood? Do you change your filter every week? You’ll probably want something that lifts easily. Do you want to set it and forget it? Then a tighter fit will look cleaner.
In conclusion, a canopy should of been more than just a pretty face. Yes, form is important, but so is function. Your canopy need to support the weight of those lights without them crashing down on the inhabitants inside. It needs to hide the ugly plumbing in the rear. Finally, it must be accessible from the front so you can get to the fish.
While the numbers will tell you where to start, ultimately it’s up to you and what you have set up. Take accurate measurements, factor the heat output of your lights, and budget some wiggle room. Then when that nice piece of plywood rests snugly against the rim of the tank, that blank canvas becomes the top part of your tank, not only finishing off the look but also shielding the water below.