Aquarium Sump Glass Thickness Calculator
Estimate sump panel and baffle glass thickness from unsupported span, water height, glass type, bracing, compartments, safety factor, and silicone clearance.
📏Sump panel dimensions
Measure the clear horizontal run between vertical supports, braces, or end panels.
⚙Glass, bracing, and safety
Thickness is governed by stress first, then checked against a span-to-thickness stiffness guide.
Calculation breakdown
🧪Glass type strength grid
📊Glass and bracing comparison
| Glass type | Working stress used | Calculator factor | Use note |
|---|---|---|---|
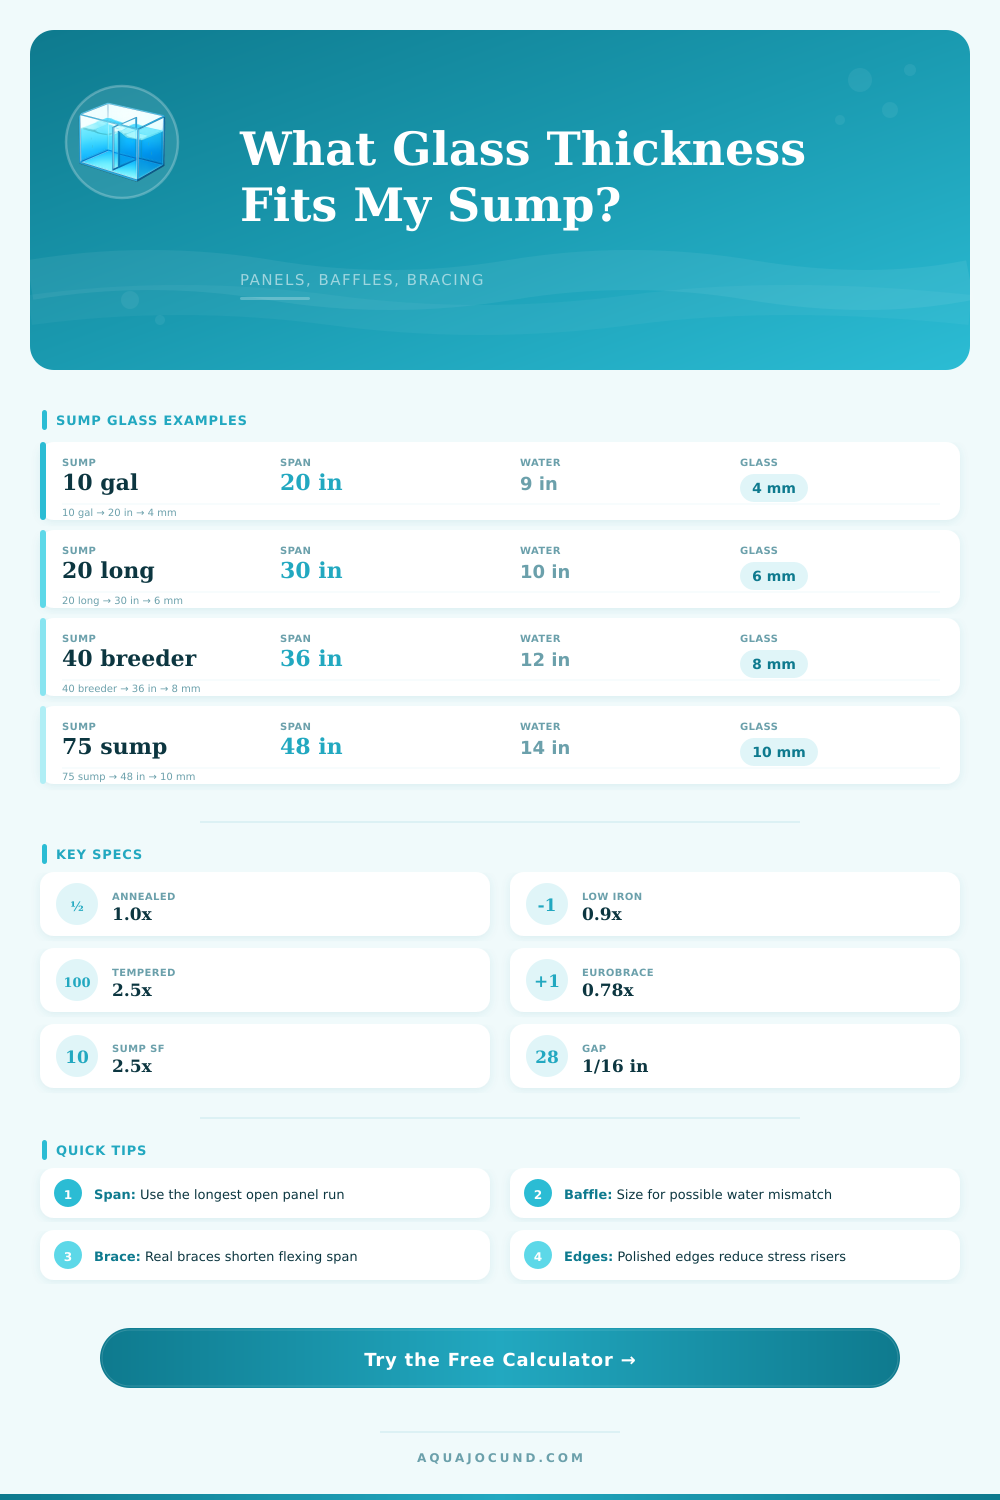
| Annealed float glass | 1000 psi / 6.9 MPa | 1.00 baseline | Common for custom sump sides and baffles |
| Low iron annealed | 900 psi / 6.2 MPa | 0.90 strength | Clearer view panels with conservative edge allowance |
| Heat-strengthened | 1500 psi / 10.3 MPa | 1.50 strength | Middle ground when fabrication is controlled |
| Tempered glass | 2500 psi / 17.2 MPa | 2.50 strength | Must be final sized before tempering |
| Laminated annealed | 800 psi / 5.5 MPa | 0.80 strength | Use cautiously because layers share load imperfectly |
| Used aquarium glass | 700 psi / 4.8 MPa | 0.70 strength | Derated for scratches, old chips, and unknown handling |
| Bracing style | Span factor | Stress coefficient | Practical meaning |
|---|---|---|---|
| Open top, no brace | 1.00 | 0.220 | Panel uses the full measured unsupported span |
| Plastic rim or top frame | 0.92 | 0.195 | Top edge restraint reduces long-panel bowing |
| One center cross brace | 0.72 | 0.175 | Long panel acts closer to two shorter panels |
| Eurobrace strips | 0.78 | 0.165 | Continuous top strips limit edge rotation |
| Rim plus baffle bonding | 0.68 | 0.155 | Baffles and top restraint shorten flexing length |
📐Common sump size reference
| Sump size | Typical dimensions | Usual water height | Starting glass range |
|---|---|---|---|
| 10 gallon nano sump | 20 x 10 x 12 in / 51 x 25 x 30 cm | 8 to 9 in / 20 to 23 cm | 4 to 5 mm panels, 4 mm baffles |
| 20 long sump | 30 x 12 x 12 in / 76 x 30 x 30 cm | 9 to 10 in / 23 to 25 cm | 5 to 6 mm panels, 5 mm baffles |
| 29 gallon tall sump | 30 x 12 x 18 in / 76 x 30 x 46 cm | 11 to 13 in / 28 to 33 cm | 6 mm panels, 5 to 6 mm baffles |
| 40 breeder sump | 36 x 18 x 16 in / 91 x 46 x 41 cm | 10 to 12 in / 25 to 30 cm | 6 to 8 mm panels, 6 mm baffles |
| 55 gallon refugium | 48 x 13 x 21 in / 122 x 33 x 53 cm | 12 to 15 in / 30 to 38 cm | 8 to 10 mm panels, 6 mm baffles |
| 75 gallon equipment sump | 48 x 18 x 21 in / 122 x 46 x 53 cm | 13 to 16 in / 33 to 41 cm | 10 mm panels, 8 mm baffles |
🧱Baffle and silicone clearance table
| Measured inside width | Clearance each side | Cut baffle width | Fit note |
|---|---|---|---|
| 10.00 in / 254 mm | 1/16 in / 1.6 mm | 9.88 in / 251 mm | Snug glass baffle with room for silicone bead |
| 12.00 in / 305 mm | 1/16 in / 1.6 mm | 11.88 in / 302 mm | Common 20 long or 29 gallon sump cut |
| 13.00 in / 330 mm | 3/32 in / 2.4 mm | 12.81 in / 325 mm | Useful when tank width varies along the rim |
| 18.00 in / 457 mm | 1/8 in / 3.2 mm | 17.75 in / 451 mm | More room for thick beads or imperfect panels |
💡Sump glass sizing tips
Sump Building your own aquarium sump can feel different. You’ve got the plans drawn up. You’ve placed the order for the glass. You’ve got a few pieces lying around and you haven’t filled it with water yet. It’s not so much a worry if your tank will hold water as it is if the back panel will bow and/or crack when the tank is fully loaded.
Glass thickness is hardly an exact science when it comes to building tanks. It relies on variables that change depending upon construction. That’s what makes calculators useful; they eliminates the guess work and let you get to actually assembling things instead of looking at a spreadsheet full of bending stress equations all weekend.
How to Build a Safe Sump
That brings me to the first (and arguably the most critical) parameter, the unsupported span. For those who is new, this refers to the distance between two solid supports where there is no glass being supported by anything else. Many folks confuse this value with the overall tank length. They think they need to build it really thick because they think their tank is so long.
You’ll notice I said if it has a top rim clamp across the width, or a eurobrace… all those becomes points of support. In essence, they divide your long panel into separate sections. So yes, you can go down on glass thickness while maintaining strength. Once you enter your span and any bracing configuration, the tool does the math for you. No more guessing about how much a plastic rim assist.
Length isn’t everything, either. The deeper you make your sump, the greater hydrostatic pressure will be put onto it. The bottom of your sump is under far greater pressure than the first inch above it. A wide but shallow sump will often require thinner glass then a narrow tank filled to the brim. A wide but shallow sump will often require thinner glass then a narrow tank filled to the brim.
Also, consider what happens if something goes wrong. What if your media bags gets clogged? What if your return pump stops working? Your water level will rise and fall in different compartments. This creates a tremendous amount of stress on your internal baffles. Most builders account for normal operating conditions, not the higher loads caused by equipment failure or maintenance.
There is one more thing to consider: glass type. You can go with thinner glass by choosing tempered instead of annealed. But once tempered, it can’t be drilled or cut. So predrilling for bulkhead installations becomes a requirement. Pre-drilling means there is no room for mistakes. That might mean you’re hosed if you change plans.
Annealed requires more thickness to handle the same load. It is also more flexible when being fabricated. A chart on the page spells all this out. Including comparison between different materials and their working stress. This isn’t just a matter of selecting maximum strength material. It’s finding the right material for your fabrication process.
Engineering caution and personal preference intersect in the safety factors. Thicker glass means a larger safety factor. A heavier sump means a higher safety factor. If you’re using a basement sump that’s got a solid stand, you can likely run those numbers leaner and be OK. However, if it’s a display tank sitting over a hardwood floor, you probably want to give yourself some margin of error. This slider allows you to adjust the calculator based off your own level of risk tolerance.
It also considers edge conditions, since poorly finished edges are the most common point of failure in glass tanks. Why do you think you see so many cheap, rough-cut pieces of glass fail early? Because they have enough thickness on paper, but not enough to distribute stress when the edges is polished.
The not-so-sexy part that makes or breaks your build is silicone clearance. You want to be able to run a good bead of silicone all around and if you cut your baffles too tightly, there’s no way to get it in the corners. That’s a dry corner, which means it’s a leak just waiting to happen.
The tool accounts for the gap required during install and lets you know how wide to make your cuts so that when you slide those baffles home, they’ll be snug but still leave enough room for the adhesive to do their jobs. Do it right and you avoid the frustration of having to force panels into place and crack them while the tank hasn’t even been filled yet.
So really, what does making a sump boil down to? It is preparation to manage risk. It’s not like you can alter the physics of water pressure, but you CAN control how your structure reacts to it. You look at your glass quality, the brace placement, and the span. This shifts you from arbitrary rules of thumb to something that actualy works for your setup.
This isn’t simply about having a tank that can hold water. It is about having a tank that keeps its shape for decades to come. That peace of mind begins well before the first drop of water touches the glass.