Aquarium Drilling Hole Size Calculator
Match a bulkhead to the correct hole saw, check glass thickness and edge clearance, estimate overflow flow capacity, and flag panel drilling risk before you cut.
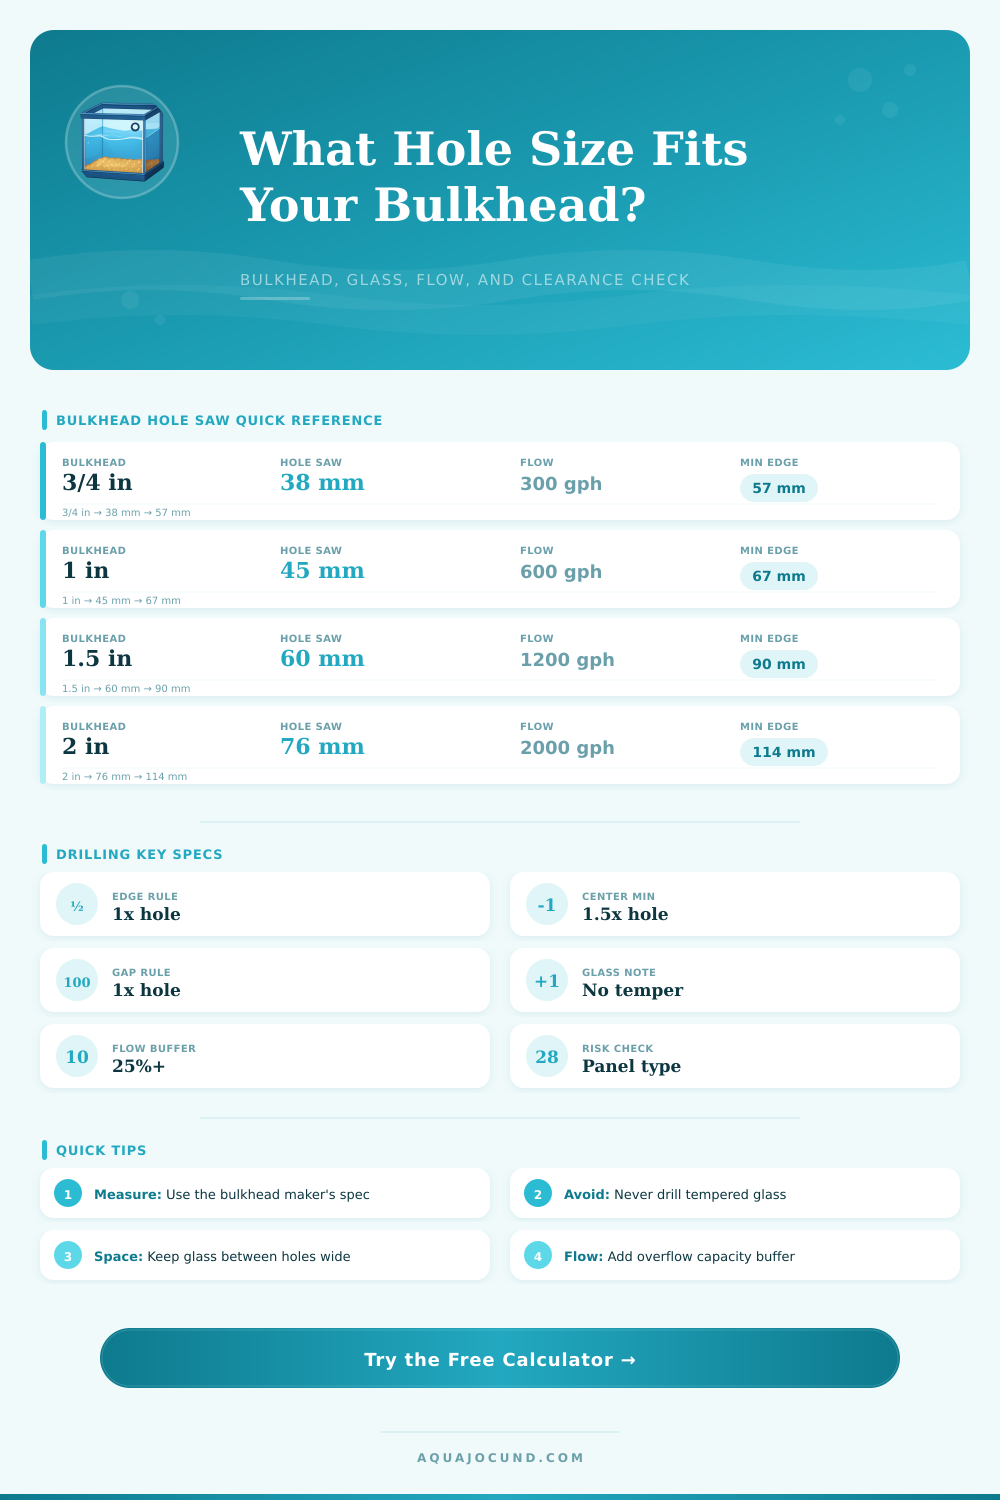
| Nominal Bulkhead | Typical Standard Hole | Typical Heavy Hole | Conservative Open Drain | Common Aquarium Use |
|---|---|---|---|---|
| 1/2 in | 1 1/8 in / 29 mm | 1 3/8 in / 35 mm | 120 gph | Small return line, dosing reservoir, nano sump |
| 3/4 in | 1 1/2 in / 38 mm | 1 5/8 in / 41 mm | 300 gph | Nano overflow, return line, small frag tank |
| 1 in | 1 3/4 in / 45 mm | 1 7/8 in / 48 mm | 600 gph | Most small to medium overflow drains |
| 1 1/4 in | 2 1/8 in / 54 mm | 2 1/4 in / 57 mm | 900 gph | Quiet medium overflow or larger return plumbing |
| 1 1/2 in | 2 3/8 in / 60 mm | 2 5/8 in / 67 mm | 1200 gph | Reef overflow, Herbie, BeanAnimal main lines |
| 2 in | 3 in / 76 mm | 3 1/4 in / 83 mm | 2000 gph | Large display drains, pond boxes, external overflow |
| 2 1/2 in | 3 1/2 in / 89 mm | 3 3/4 in / 95 mm | 3000 gph | Large pond or public display filtration |
| 3 in | 4 in / 102 mm | 4 1/2 in / 114 mm | 4500 gph | Very large drains and high-flow water features |
| Check | Conservative Rule | Why It Matters | Calculator Flag |
|---|---|---|---|
| Center to panel edge | At least 1.5x hole diameter | Leaves about one full hole diameter of glass beyond the cut | Risk rises when actual is below the minimum |
| Glass between holes | At least 1x hole diameter | Thin bridges between cuts can crack during drilling or tightening | Center spacing should be 2x hole diameter or more |
| Glass thickness | Prefer 4x or more versus hole size denominator | Thin panels chip easily with large holes and heavy fittings | Large holes in thin glass add risk points |
| Bulkhead nut area | Keep flange and nut clear of trim | A bulkhead that cannot seat flat will leak or stress the panel | Near trim layouts add a caution |
| Flow capacity | Capacity should exceed target plus buffer | Overflow noise and flood risk increase when drains run near limit | Under-buffered drains raise the rating |
| Tempered status | Do not drill tempered glass | Tempered glass normally shatters when cut | Confirmed tempered forces high risk |
| Tank / Setup | Typical Bulkhead | Usual Hole Count | Flow Range | Layout Note |
|---|---|---|---|---|
| 10 gal nano return | 1/2 or 3/4 in | 1 | 80-250 gph | Small panels need generous spacing and light fittings |
| 20 long Herbie | 3/4 or 1 in | 2 | 250-600 gph | Keep the siphon and emergency holes separated cleanly |
| 40 breeder reef | 1 or 1 1/2 in | 2-3 | 400-900 gph | Back panel drilling is common if non-tempered |
| 75 gal BeanAnimal | 1 or 1 1/2 in | 3 | 600-1200 gph | External boxes often need precise horizontal spacing |
| 125 gal dual overflow | 1 1/2 in | 2-4 | 900-1800 gph | Use capacity buffer so drains run quieter |
| Pond filter box | 2 or 3 in | 1-2 | 1500-4500 gph | Acrylic or plastic boxes tolerate larger holes better than glass |
| Step | Good Practice | Reason | Common Mistake |
|---|---|---|---|
| Confirm panel | Verify non-tempered glass before any drilling | Tempered panels fail instantly when cut | Assuming only the bottom is tempered |
| Confirm hole | Read the exact bulkhead hole spec | Bulkhead brands vary by flange and thread body | Buying a hole saw from a generic chart only |
| Support glass | Drill on a stable, flat, padded surface when possible | Panel movement increases chip and crack risk | Letting the tank twist while drilling |
| Use water | Keep the diamond bit wet and cool | Heat and dry grit shorten bit life and chip the edge | Pressing harder instead of cooling the cut |
| Start angle | Begin at a slight angle, then level the saw | Prevents the bit from skating across the panel | Starting flat without a guide |
| Tighten bulkhead | Hand tight plus a small extra turn if needed | Over-tightening can crack glass around the hole | Using the nut to crush the gasket |
Installing a bulkhead in an aquarium tank panel require planning because installing a bulkhead can cause stress on the aquarium glass panel if it isnt install correctly. Deciding on the size and placement of a hole in the tank panel before drilling it is the first step in installing a bulkhead. The size of the bulkhead hole determine the flow rate of the water and whether the aquarium will make noise when water drain from the tank.
Bulkhead sizes is not measured in the size of the hole that it will take in the aquarium tank. The size of the bulkhead refer to the size of the pipe that it is sized for. A bulkhead that is the size of a one-inch pipe will not necessarily fit into an one-inch hole in the aquarium tank panel.
Installing a Bulkhead in an Aquarium Tank
Additionally, the specifications for a bulkhead that is scheduled for 40 psi may not be the same as the specifications for a bulkhead that is scheduled for 80 psi. Another factor to consider when installing bulkheads is the thickness of the aquarium tank panel. A larger hole should not be drilled into a thin tank panel because the stress on the thin tank panel will be greater at the location of the hole.
Additionally, depending on the type of glass that the maker uses to create the aquarium tank panels, it may not be possible to drill into the aquarium tank panel. Many aquarium tanks has tempered glass for there tank bottoms, and tempered glass will shatter if it is drilled. If the type of glass is not known for the aquarium tank, then there is a risk that the aquarium tank will fail during the bulkhead installation process.
Another factor to consider when installing bulkheads is the flow capacity of the bulkhead that will be installed in the aquarium tank. The bulkhead size will determine the amount of water that will leave the aquarium tank. Using too large of a bulkhead will cause the aquarium stand to flood and create too much noise in the aquarium room.
Additionally, if the drain has too high of a flow capacity, the water will move too quickly out of the tank. The flow capacity will also be affected by the style of the drain. A full siphon will move more water than an open pipe of the same diameter.
When drilling the hole for the bulkhead, there are some physical variables to consider. For example, older aquarium tanks may have scratches on the tank panel that will become cracks when the bulkhead is installed into the tank. New aquarium tanks may have plastic trim around the edges of the tank panels that will prevent the bulkhead nut from functioning correct.
One way of drilling the hole is to support the aquarium tank panel on its sides from below while drilling the hole. Additionally, keeping the drill bit wet while drilling the hole will prevent the glass from heating up and developing micro-fractures at the edge of the bulkhead hole. Many people may feel the temptation to install a bulkhead that is larger in size than is needed for the aquarium to allow for more water to be drain in the future.
However, installing a large bulkhead will remove more glass from the aquarium tank panel and require more clearance from the edge of the tank panel. Additionally, the use of smaller bulkheads with holes in the aquarium tank panel may be a better solution than the use of one large bulkhead. Using multiple bulkheads with smaller sized holes will distribute the drain load more evenly across the aquarium tank panel.
Additionally, if one bulkhead becomes clog, the others can still drain the water from the aquarium tank. After deciding on the size and placement of the bulkheads for the aquarium tank, you can drill the bulkhead using a hole saw. However, before you drill the bulkheads into the glass aquarium tank panel, the measurements of the tank panel thickness and the temper status of the glass should of been checked.
Following these steps will create an aquarium tank that will function as intended while avoiding any leak or noise issues from the aquarium tank.