In-Wall Aquarium Opening Size Calculator
Estimate rough wall opening, finished viewing window, clearances, service space, wall-depth fit, and tank volume for an in-wall aquarium layout.
📏Tank and wall dimensions
Use the finished face-to-face wall thickness at the aquarium opening.
🧰Clearance and finish allowances
This estimates the visible glass window after the face trim covers the tank edge.
Calculation Breakdown
🧱Finish profile quick specs
📋Opening reference tables
| Finish profile | Typical return build | Default clearance | Reveal planning note |
|---|---|---|---|
| Painted drywall return | 0.5 in / 1.3 cm | 0.5 side, 0.75 top | keep paper edge away from splashes |
| Sealed plywood liner | 0.75 in / 1.9 cm | 0.5 side, 0.75 top | good for square removable panels |
| PVC sheet liner | 0.25 in / 0.6 cm | 0.375 side, 0.5 top | thin return preserves viewing area |
| Wood face frame | 0.75 in / 1.9 cm | 0.5 side, 0.75 top | overlap hides plastic trim and seams |
| Tile and backer surround | 0.625 in / 1.6 cm | 0.75 side, 1.0 top | allow layout room for grout lines |
| Stone slab surround | 1.25 in / 3.2 cm | 1.0 side, 1.25 top | large reveal needs generous rough opening |
| Aluminum angle frame | 0.125 in / 0.3 cm | 0.25 side, 0.375 top | tightest finish, verify square framing |
| Oversized shadow gap | 1.0 in / 2.5 cm | 1.25 side, 1.5 top | large dark gap hides wall movement |
| Common tank | Outside dimensions | Volume | Typical in-wall rough opening |
|---|---|---|---|
| 20 high | 24 x 12 x 16 in / 61 x 30 x 41 cm | 20 gal / 76 L | about 26 x 18 in with access top |
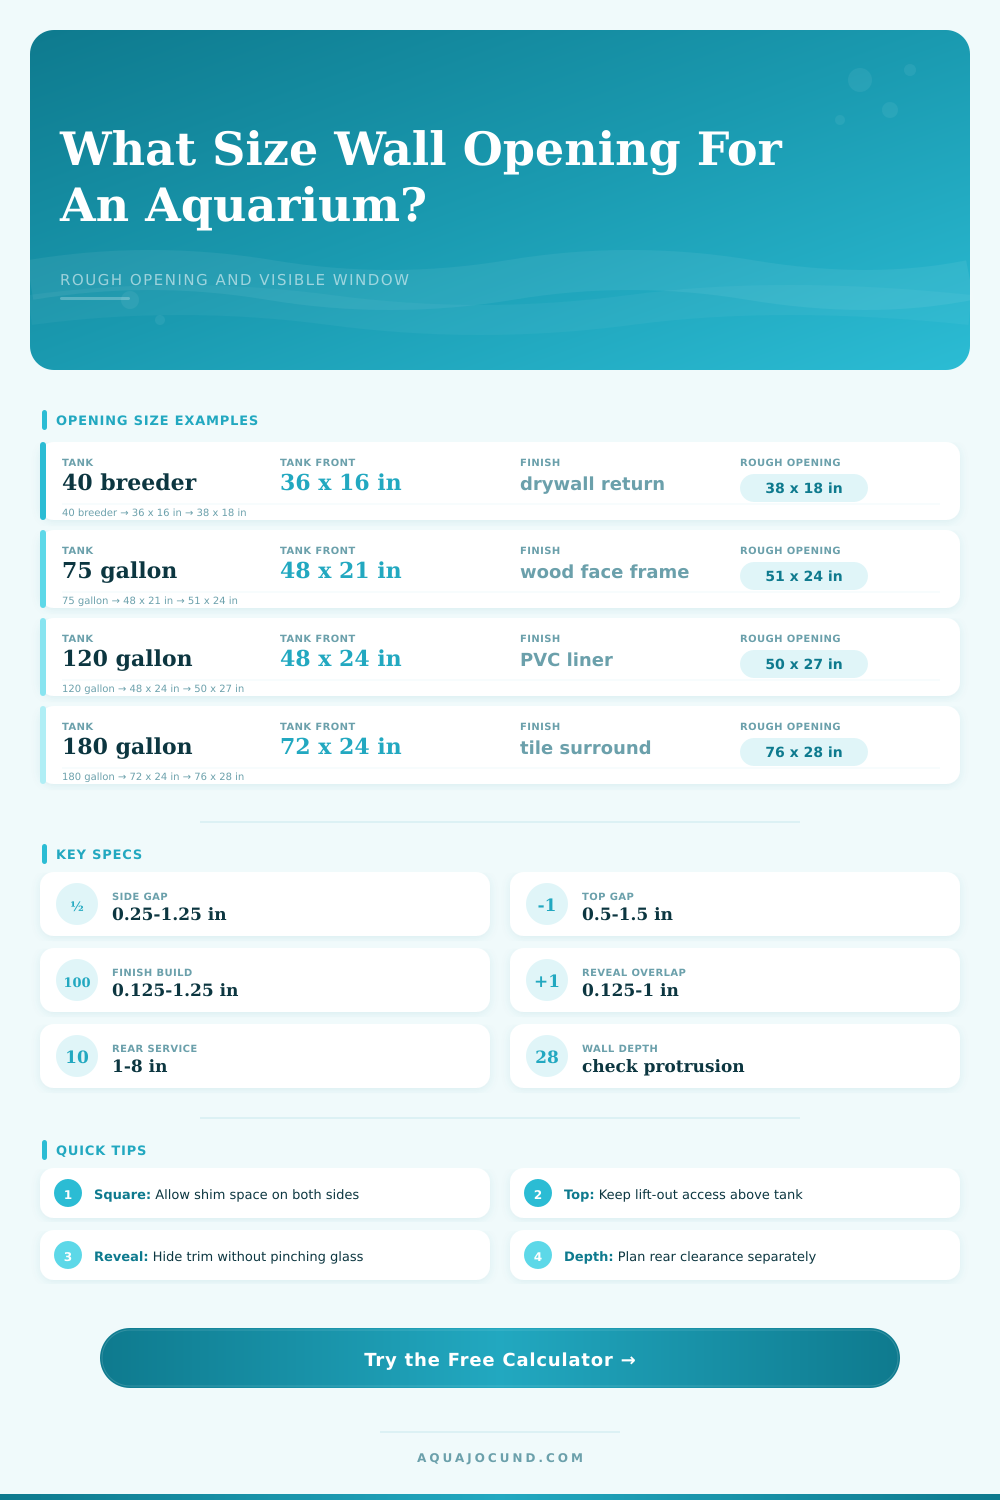
| 40 breeder | 36 x 18 x 16 in / 91 x 46 x 41 cm | 40 gal / 151 L | about 38 x 18 in display face |
| 55 gallon | 48 x 13 x 21 in / 122 x 33 x 53 cm | 55 gal / 208 L | about 51 x 24 in with wood trim |
| 75 gallon | 48 x 18 x 21 in / 122 x 46 x 53 cm | 75 gal / 284 L | about 51 x 24 in with rear access |
| 90 gallon | 48 x 18 x 24 in / 122 x 46 x 61 cm | 90 gal / 341 L | about 52 x 28 in with tile surround |
| 120 gallon | 48 x 24 x 24 in / 122 x 61 x 61 cm | 120 gal / 454 L | about 50 x 27 in with PVC liner |
| 125 gallon | 72 x 18 x 21 in / 183 x 46 x 53 cm | 125 gal / 473 L | about 75 x 24 in long reveal |
| 180 gallon | 72 x 24 x 24 in / 183 x 61 x 61 cm | 180 gal / 681 L | about 76 x 28 in with tile surround |
| Clearance item | Use in formula | Common range | Measurement note |
|---|---|---|---|
| Side clearance | tank width plus both sides | 0.25 to 1.25 in / 0.6 to 3.2 cm | allows shimming and out-of-square framing |
| Top clearance | tank height plus top gap | 0.5 to 1.5 in / 1.3 to 3.8 cm | separate from service lift-out space |
| Finish build | added outside finished opening | 0.125 to 1.25 in / 0.3 to 3.2 cm | return thickness on each opening edge |
| Face overlap | subtracted from visible window | 0.125 to 1.0 in / 0.3 to 2.5 cm | hide rim without touching the glass |
| Utility chase | one-side rough opening addition | 0 to 6 in / 0 to 15 cm | use for cords, plumbing, or removable trim |
| Rear equipment gap | tank depth plus rear space | 1 to 8 in / 2.5 to 20 cm | compare against wall depth or cabinet depth |
| Access priority | Top service factor | Depth factor | Best calculation use |
|---|---|---|---|
| Rear or fish-room access | 1.00x | 1.00x | opening face can stay tighter |
| Front-only service access | 1.45x | 1.10x | adds room for lids and front tools |
| Front and rear service access | 1.20x | 1.05x | balanced maintenance envelope |
| Display-only face opening | 0.65x | 0.90x | for a separate hidden service hatch |
💡Opening measurement tips
It’s all fun and games until someone falls in love with a tank, buys it, then finds out their wall isn’t quite ready to accept said tank. Either the opening are too large for aesthetic purposes or too small to shim and fill.
Before reaching for a saw, this calculator fills that gap by estimating the service space, visible window area, and rough framing size you’ll require. That way you don’t go guessing while holding a two hundred pound tank.
How to Plan Your Aquarium Wall Space
Here is an example. How do we get from A to B? What’s the math at work here?
Well the key is to know the difference between the rough opening and visible window. Your framer will cut a hole in the wall (rough opening) bigger then the actual glass (tank). This allows for thickness of your finished material, clearance around it, and shims. The visible window is the part you see once you overlap edge of the tank with trim, wood face frames, or tile. People commonly get confused about those two numbers and go down the wrong path with their project.
The tool use your tank dimensions, desired clearances, and finish profile to take care of that for you.
Profile, Most folks don’t give much thought to this option. This is where thickness of your finish material adds up in the rough opening size. However, you’d be surprised how little space a thin aluminum angle frame takes up in your rough opening. If you’re using a stone slab as your surround, there’s also the mortar, backer board, and thickness of the stone to account for. You’d have to cut into finished walls if you framed around the slimmer trim first, only to discover that you want stone. Depending on what materials you choose, the calculator will factor them into the rough opening. Then it add the correct return thickness to the outside edge to ensure your final frame doesn’t pinch the glass.
Another place where good intentions go wrong is with clearances. How about a quarter inch on both sides? Nope. Walls aren’t perfectly square. Aquariums aren’t rectangles either. You want some wiggle room so you can shim the tank or the stand as needed to get even distribution of weight. And uneven pressure are the #1 reason why tanks crack. Having half an inch or more on all sides gives you plenty of room to slip the tank in, make sure it’s level and then tweak if necessary…without having to force fit anything into place. Same goes for the top clearance. Do you have space to put your hands, lights, lids, etc? If not, you built yourself a pretty tank that is a nightmare to maintain. You might of made a nice little niche, but it was too tight up top.
Many people overlook the fact that we want to be able to service our tanks. For example, if your tank is flush with the wall, how do you change the filter? Are you going to have to remove a panel or is there some sort of chase in the back where you can work on the plumbing? Does the tank sits flush against the wall?
The calculator allows you to account for service access. Add width to accommodate a side chase for hose and cord storage. Adjust for gaps in the rear of the tank to allow space for equipment. What happens when you close off the wall and then realize you don’t have any space behind the tank for tubing? Know how far out from the wall you need to go before closing things up.
And then there are those tables of references on the page. These tables provide some examples from the real world. These tables illustrate the difference between a tile surround and a drywall return. These tables demonstrate just how much tile adds to a space. These tables can help you see those tradeoffs. Do you want something stunning? Go with a tile surround. But understand that means a bigger rough opening. Want something modest yet efficient? Painted drywall returns. Your skillset and your aesthetic goals will guide which direction you go.
This is the bottom line. It’s a lesson in planning for the unseen. We can see the glass. We can see the water. We can even see the fish. What we can’t see when the job is completed are the shims, the shims, the shims. We can’t see the clearances or the service space or the finish returns.
When done correctly, you’ll never give those another thought. When they’re incorrect, you’ll spend years dealing with the consequences. Use the calculator to help get them right the first time. Use it to turn guesses into plans. A good plan is the only thing between a cracked tank and a beautiful one.
Begin by knowing the rough opening, proceed towards what you’ll see through the window, and account for the messiness of actual construction. That’s how you build a water holding wall.